前端调取摄像头并实现拍照功能
window.navigator
最近在开发一个过年贺卡的webAPP,使用手机调取摄像头完成拍摄功能。我简单整理了下实现思路,做一个分享。
首先要注意的是,摄像头和麦克风权限只在https和localhost下允许访问,不是本地mediaDevices直接没有
你想调取手机的摄像头,首先你得先检验当前设备是否有摄像设备,window身上自带了一个navigator属性,这个对象有一个叫做mediaDevices的属性是我们即将用到的。
于是我们就可以先设计一个叫做checkCamera的函数,用来在页面刚开始加载的时候执行。
我们到这一步只是需要判断当前设备是否有摄像头,我们先调取enumerateDevices函数来查看当前媒体设备是否存在。它的返回值是一个promise类型。
其中,如果查询正确的话,enumerateDevices会打印得到如下(本机的各种媒体设备):

checkCamera() {
    return new Promise((resolve) => {
        // 摄像头和麦克风权限只在https和localhost下允许访问,不是本地mediaDevices直接没有
        const navigator = window.navigator.mediaDevices;
        if (!navigator) {
            resolve(false);
        } else {
            //  enumerateDevices 函数来查看当前媒体设备是否存在。它的返回值是一个 promise 类型
            navigator.enumerateDevices()
                .then((devices) => {
                    resolve(Array.isArray(devices) && devices.length > 0);
                })
                .catch(() => {
                    resolve(false);
                });
        }
    });
}
上图可以看出,我的电脑有两个音频设备和一个视频设备,那么我们就可以放下进行下一步了。
获取摄像头
接下来就需要用到函数,navigator.getUserMedia。这个函数接收一个对象作为参数,这个对象可以预设一些值,来作为我们请求摄像头的一些参数。
这里我们的重点是facingMode这个属性,因为我们拍照一般都是后置摄像头。当然我们在电脑上测试的时候还是用前置摄像头,也就是user。
const stream = await navigator.getUserMedia({
    // 不需要音频 所以设置为false
    audio: false,
    video: {
        width: 300,
        height: 300,
        // 强制后置摄像头
        facingMode: {
            // user 前置摄像头
            // exact: "environment" 后置摄像头
            exact: 'user'
        }
    }
});
当你执行了这个函数以后,你会看到浏览器有如下提示:
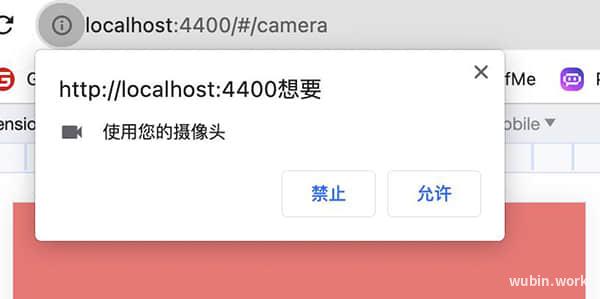
当出现这个提示的时候,证明已经调用成功了。
到这一步,这个函数只是返回了一个媒体流信息给你,你可以这样简单理解刚刚我们干了什么,首先浏览器向手机申请我想用一下摄像头可以吗?在得到了你本人的确认以后,手机将摄像头的数据线递给了浏览器,:“诺,给你。”,但浏览器现在仅仅拿到了一根数据线,然而浏览器不知道需要将这个摄像头渲染到哪里,它不可能自动帮你接上这根线,你需要自己找地方接上这根数据线。所以这里我们需要请到我们的原生Video标签。
<video ref="cameraVideoRef"
        x-webkit-airplay="true"
        x5-playsinline="true"
        playsinline="true"
        webkit-playsinline="true"
        x5-video-player-type="h5"
        x5-video-player-fullscreen="true"
        x5-video-orientation="portraint"
></video>这里的关键点在于将流数据赋值给video标签的srcObject属性。就好像你拿到了数据线,插到了显示器上。(tips: 这里需要特别注意,不是 video.src 而是 video.srcObject 请务必注意)

这一步,我们也要考虑,如果用户点击“取消”的话,我们应该怎么办?
所以,我在具体项目种,使用的try-catch:
try {
    const navigator = window.navigator.mediaDevices;
    // 获取摄像流数据
    const stream = await navigator.getUserMedia({
        // 不需要音频 所以设置为false
        audio: false,
        video: {
            width: 500,
            height: 500,
            // 强制后置摄像头
            facingMode: {
                // user 前置摄像头
                // exact: "environment" 后置摄像头
                exact: user
            }
        }
    });
    if (!this.$refs.cameraVideoRef) {
        return;
    }
    this.$refs.cameraVideoRef.srcObject = stream;
    this.$refs.cameraVideoRef.play();
} catch (e) {
    // 如果在用户授权界面,点击-取消
    window.alert('请您“同意”,以便我们开启您的摄像头权限');

    this.closeCamera();
}
截图
原理
这里你需要知道一个前提,虽然我们现在看到的视频是连贯的,但其实在浏览器渲染的时候,它其实是一帧一帧渲染的。就像宫崎骏有些动漫一样,是一张一张手写画。
让我们打开 Performance 标签卡,记录一下打开掘金首页的过程,可以看到浏览器的整个渲染过程其实也是一帧一帧拼接到一起,才完成了整个页面的渲染。
知道了这个前提,那么举一反三,我们就可以明白,虽然我们现在已经打开了摄像头,看到的视频好像是在连贯展示,但其实它也是一帧一帧拼到一起的。那现在我们要做的事情就非常明了,当我按下拍照按钮的时候,想办法将 video 标签当前的画面保存下来。在这个场景,我们需要用到canvas的一些能力。
实现
首先创建一个空白的canvas元素,元素的宽高设置为和video标签一致。
const canvas = document.createElement("canvas");
const videoEl = this.$refs.cameraVideoRef;
canvas.width = videoEl.videoWidth;
canvas.height = videoEl.videoHeight;接下来是重点: 我们需要用到 canvas 的 getContext 方法,先别着急头晕,这里你只需要知道,它接受一个字符串 "2d" 作为参数就行了,它会把这个画布的上下文返回给你。
在这个ctx对象身上,我们只需要用到一个drawImage方法即可,不需要关心其它属性。
http://doc.wubin.work/canvas-api/drawImage.html
感觉参数有点多?没关系,我们再精简一下,我们只需要考虑第二个用法,也就是5参数的写法。(sx,sy 是做裁切用到的,本文用不到,感兴趣可以自行了解。)
context.drawImage(image, dx, dy, dWidth, dHeight);这里先简单解释一下dx和dy是什么意思。在 canvas 里也存在一个看不见的坐标系,起点也是左上角。设想你想在一个HTML的body元素里写一个距离左边距离100px距离顶部100px的画面,是不是得写margin-left:100px margin-top:100px这样的代码?没错,这里的dy和dx也是同样的道理。

我们再看 dwidth,和 dheight,从这个名字你就能才出来,肯定和我们将要在画笔里画画的元素的宽度和高度有关,是的,你猜的没错,它就好像你设置一个 div 元素的高度和宽度一样,代表着你将在画布上画的截图的宽高属性。
现在只剩下第一个参数还没解释,这里直接说答案,我们可以直接将 video 标签填进去,ctx 会自动将当前 video 标签的这一帧画面填写进去。现在拍摄按钮的代码应该是这个样子。
const canvas = document.createElement("canvas");
const videoEl = this.$refs.cameraVideoRef;
canvas.width = videoEl.videoWidth;
canvas.height = videoEl.videoHeight;
//拿到 canvas 上下文对象
const ctx = canvas.getContext("2d");
ctx.drawImage(videoEl, 0, 0, canvas.width, canvas.height);
//将 canvas 投到页面上
document.body.appendChild(canvas);
遇到的问题
如何关闭摄像头
方法有很多
- 设置video的srcObject=null
- 直接从dom移除 video 标签
- video 设置 display:none
前置摄像头时拍摄画面和人是相反的
getUserMedia使用前置拍摄时,会发现画面是想法的镜像。这里我们分为两步解决,1是修改video渲染画面的镜像;2修改截图后的镜像。
1、修改video渲染画面的镜像
修改这个比较简单,直接把video标签transform: rotateY(180deg);旋转,这样就可以了。
/* 前置摄像头 图像会被反转,使用样式进行纠正 */
video.rotate180{
   transform: rotateY(180deg);
}
但是仅仅翻转镜头还不够,我们发现翻转摄像画面后,截图依然还是“翻转”的,所以,我们需要再对截图的画面也进行翻转。
2、对canvas进行翻转。
这里可以参考我之前的一篇文章:《使用canvas实现对图片的翻转》https://www.wubin.work/blog/articles/450
这里我们在截图的时候执行一次判断:
const canvas = document.createElement("canvas");
const videoEl = this.$refs.cameraVideoRef;
canvas.width = videoEl.videoWidth;
canvas.height = videoEl.videoHeight;

const ctx = canvas.getContext("2d");

// 如果是前置摄像头 那么就需要对canvas进行翻转
if (this.facingMode == 'user') {
    ctx.scale(-1, 1);
    ctx.translate(-videoEl.videoWidth, 0);
}

ctx.drawImage(videoEl, 0, 0, canvas.width, canvas.height);
const base64 = canvas.toDataURL("image/png", 1);
console.log(base64)
拍照组件完整代码
<template>
    <transition name="photoAni"
                @after-enter="afterEnter"
    >
        <div class="take-photograph" v-show="showCamera">
            <headbar text="拍摄照片"></headbar>
            <div class="video-wrapper" :style="videoWrapperStyle">
                    <video ref="cameraVideoRef"
                           x-webkit-airplay="true"
                           x5-playsinline="true"
                           playsinline="true"
                           webkit-playsinline="true"
                           x5-video-player-type="h5"
                           x5-video-player-fullscreen="true"
                           x5-video-orientation="portraint"
                           :class="videoCls"
                    ></video>
            </div>

            <div class="take-controls">
                <div class="take-btn-wrapper">
                    <div class="take-btn" @click="takePicture"></div>
                </div>
                <div class="close">
                    <button type="button" @click="closeCamera">关闭</button>
                </div>
                <div class="turn-reversal" @click="toggleDirection">
                    <i class="icon-reversal"></i>
                </div>
            </div>
        </div>
    </transition>

</template>

<script type="text/ecmascript-6">
    import Headbar from '@/components/headbar/headbar';


    // 摄像头要截取的尺寸
    const cropWidth = Math.floor(document.body.clientWidth) - 20 * 2;
    const FACING = {
        // 前摄像头
        front: "user",
        // 后摄像头
        back: "environment"
    };
    const DEBUG = window.setting.debug || false;

    export default {
        name: "take-photograph",
        emits: [ 'finish' ],
        components: {
            Headbar
        },
        data() {
          return {
              showCamera: false,
              // 摄像头朝向,默认后摄像头 调试模式为前摄像头
              facingMode: DEBUG ? FACING.front : FACING.back
          }
        },
        computed: {
            videoWrapperStyle() {
                return `width: ${cropWidth}px;height: ${cropWidth}px`;
            },
            videoCls() {
                return this.facingMode == FACING.front ? 'rotate180' : ''
            }
        },
        methods: {
            async open() {
                const hasCamera = await this.checkCamera();
                if (!hasCamera) {
                    window.alert('抱歉,未检测到您设备上的摄像头');
                    return;
                }
                this.showCamera = true;

            },
            // 切换摄像头方向
            toggleDirection() {
                // 调式模式下不支持切换
                if (DEBUG) {
                    window.alert('当前为调试模式,不支持切换摄像头方向');
                    return;
                }

                if (this.facingMode == FACING.front) {
                    this.facingMode = FACING.back;
                } else {
                    this.facingMode = FACING.front;
                }
                // 切换时先关闭
                this.$refs.cameraVideoRef.srcObject = null;
                this.getMedia();
            },
            checkCamera() {
                return new Promise((resolve) => {
                    // 摄像头和麦克风权限只在https和localhost下允许访问,不是本地mediaDevices直接没有
                    const navigator = window.navigator.mediaDevices;
                    if (!navigator) {
                        resolve(false);
                    } else {
                        //  enumerateDevices 函数来查看当前媒体设备是否存在。它的返回值是一个 promise 类型
                        navigator.enumerateDevices()
                            .then((devices) => {
                                resolve(Array.isArray(devices) && devices.length > 0);
                            })
                            .catch(() => {
                                resolve(false);
                            });
                    }
                });
            },
            afterEnter() {
                this.getMedia();
            },
            async getMedia() {
                const exact = this.facingMode;
                try {
                    const navigator = window.navigator.mediaDevices;
                    // 获取摄像流数据
                    const stream = await navigator.getUserMedia({
                        // 不需要音频 所以设置为false
                        audio: false,
                        video: {
                            width: cropWidth,
                            height: cropWidth,
                            // 强制后置摄像头
                            facingMode: {
                                // user 前置摄像头
                                // exact: "environment" 后置摄像头
                                exact: exact
                            }
                        }
                    });
                    if (!this.$refs.cameraVideoRef) {
                        return;
                    }
                    this.$refs.cameraVideoRef.srcObject = stream;
                    this.$refs.cameraVideoRef.play();
                } catch (e) {
                    // 如果在用户授权界面,点击-取消
                    window.alert('请您“同意”,以便我们开启您的摄像头权限');
                    this.closeCamera();
                }
            },
            closeCamera() {
                this.$refs.cameraVideoRef.srcObject = null;
                this.showCamera = false;
            },
            takePicture() {
                const canvas = document.createElement("canvas");
                const videoEl = this.$refs.cameraVideoRef;
                canvas.width = videoEl.videoWidth;
                canvas.height = videoEl.videoHeight;

                const ctx = canvas.getContext("2d");

                // 如果是前置摄像头 那么就需要对canvas进行翻转
                if (this.facingMode == FACING.front) {
                    ctx.scale(-1, 1);
                    ctx.translate(-videoEl.videoWidth, 0);
                }

                ctx.drawImage(videoEl, 0, 0, canvas.width, canvas.height);
                const base64 = canvas.toDataURL("image/png", 1);

                DEBUG && this.openBase64(base64);

                this.$emit('finish', base64);

                this.closeCamera();
            },
            openBase64(base64) {
                const img = new window.Image();
                img.src = base64;

                const newWin = window.open('');
                newWin.document.body.style.background = '#000';
                newWin.document.body.style.textAlign = 'center';
                newWin.document.body.appendChild(img);
                newWin.document.title = '图片预览';
                newWin.document.close();
            }
        }
    }
</script>

<style lang="less" rel="stylesheet/less" scoped>
    .take-photograph {
        position: fixed;
        top: 0;
        left: 0;
        right: 0;
        bottom: 0;
        background-color: var(--color-lightblack);

        .video-wrapper{
            margin: 20px auto 0;
            border: 1px solid #000;
            background: #4b4b4b url("icon-camera.svg") center center no-repeat;

            /* 前置摄像头 图像会被反转,使用样式进行纠正 */
            video.rotate180{
                transform: rotateY(180deg);
            }
        }

        .take-btn-wrapper{
            display: flex;
            justify-content: center;
        }

        .take-btn{
            background-color: rgba(255,255,255,0.5);
            width: 20vw;
            height: 20vw;
            border-radius: 50%;
            display: flex;
            justify-content: center;
            align-items: center;
            &:before{
                content: "";
                width: 75%;
                height: 75%;
                display: block;
                background-color: #fff;
                border-radius: 50%;
            }
        }

        .take-controls{
            position: absolute;
            bottom: 0;
            left: 0;
            right: 0;
            padding-bottom: 20px;
        }

        .turn-reversal{
            text-align: center;
            width: 20vw;
            height: 20vw;
            line-height: 23vw;
            text-align: center;
            position: absolute;
            right: 0;
            top: 0px;
        }
        .icon-reversal{
            display: inline-block;
            width: 30px;
            height: 30px;
            background: url("icon-reversal .svg") no-repeat center center;
            background-size: cover;
        }

        .close{
            text-align: center;
            padding: 20px 0 0;
            button{
                width: 40%;
                height: 45px;
                background-color: #2f2f2f;
                color: #fff;
                font-size: 14px;
            }
        }
    }

    .photoAni-enter-active,
    .photoAni-leave-active {
        transition: all 0.3s;
    }

    .photoAni-enter-from,
    .photoAni-leave-to {
        transform: translate3d(100%, 0, 0);
        opacity: 0;
    }
</style>
其中headbar就是一个高度为40px的,简单的顶部横条。调用的组件的时候,使用:
<take-photograph ref="takePhotoRef"
                 @finish="takePhotoFinish"
></take-photograph>

this.$refs.takePhotoRef.open();
DEBUG是调试模式,其主要作用就是在pc端开发时,会将生成的base64在新标签打开,方便查看效果。
window.setting = {
          // 调试模式
          debug: true
}


 目录
目录